• Home
  • Tuning Blog by John Ellis

Tuning Blog

by John Ellis, U14/16/FIS Coach, Gear
Geek, and SprongoMan.


  Where to start? Here's an
introduction to basic daily tuning

  • 18 Nov 2012 4:06 PM | Deleted user
    I have a saying about High End Tuning: "Everything changes Everything ELSE!" There are SO many variables to play with/ get confused with. So, after that teaser, let's talk about individualized tuning. 

    A good carpenter measures twice and cuts once, right? Most good artists and musicians have some idea what they want to create before they start. High end tuning is the same. You must have a goal in mind, an idea of what is standing between you and that goal, and an idea of where you are, and an idea of where your goal is- otherwise, you are shooting in the dark. AND you must work extremely precisely- as imprecision will spoil a tune.

    So individualized tuning typically starts with video, coach feedback, and/or timing. As skiers get to a higher and higher level, they generally begin to know what certain tuning settings feel like and will be able to provide feedback directly- (USSA Phase 4 and 5 athletes).

    So, if you want to help your athlete bump to the next level, ask their coach for some feedback on their equipment setup. Not all coaches are comfortable in this area. Some coaches are experts in technique and tactics but don't consider themselves geeky enough to dive into hardware questions. THAT IS NOT A NEGATIVE- We all have our areas of expertise, nobody can know everything. If you don't get an answer you are comfortable with, take some video to another coach that you know and see what they have to say.

    Individualized tuning MAY involve changing base and or side edge bevels, changing edge finish, changing base structure/finish, binding mount, lifters, or even plate tuning.

    I am sure I have raised more questions than I have given answers... BUT THAT IS MY POINT!! DO NOT just jump into individualized tuning without a plan or direction.

    But WITH a plan and a decent level of skill, all KINDS of performance improvements are possible. And once optimized, the ski setup becomes nearly magical. Faster, smoother, more powerful etc.

  • 17 Nov 2012 4:03 PM | Deleted user
    "Back in the day," we structured with sandpaper- roughing up the bases and creating drain paths for melt-water. Then came Riller- Bars, then came hand-stones. Shops used belt sanders, then moved to stone grinders- and sometimes computer controlled stone grinders. Advanced structuring is sort of the Marty McFly school of tuning: Back To The Future.

    Yes, stone grinders have revolutionized tuning for MOST skiers, but for racers at the high-end, you'd better know how to hand-structure too. After all, your skis WILL sustain base damage over the course of the season, right? Perhaps even at a race... maybe even on race day? If you are going to repair bases on a short-notice basis, you ALSO want to restore/repair the structure, right? (The answers to all these questions is "true" by the way!)

    To be prepared to deal with this eventuality, you might as well learn to hand-structure when there is no pressure.   Hand Structuring is one of the techniques I am happy to show tuners in person... but online is just too risky.
  • 16 Nov 2012 4:03 PM | Deleted user
    Taking a very good structure and making it GREAT... OR taking an OK structure and making it Very Good is the point of this blog entry.  more to follow...

    1/07/13: I have decided to NOT discuss base polishing here at this time. I would rather demonstrate the techniques/tools involved in person as it is possible to make the skis worse (instead of better) unless the skill and experience level is quite high.
  • 29 Oct 2012 4:01 PM | Deleted user
    1/07/13: This is another subject for in-person instruction. I MAY demonstrate base repair 01/12/13, IF time allows.
  • 29 Oct 2012 4:00 PM | Deleted user
    01/07/13:  Yes, edge polish is considered critical for speed skis. No, it isn't well understood by most shade-tree tuners.
    There are several ways to skin this particular cat. But it really is best to explain it in person- with several skis, tools, magnifying glass etc.
  • 29 Oct 2012 3:58 PM | Deleted user
    A picture sometimes asks a thousand questions...


    Like: what the heck is going on here?! This is a picture of a DH ski hot-boxed last night.  Both skis have thousands of bubbles on them. WHY?! They weren't there when I put the skis in the box...

    I have an idea: These bubbles prove the DEEP WAXING theory of hotboxing. They show entrapped air- which I believe escaped from the pores of the base. Why are the bubbles visible? Because I run my hotbox at an unconventionally low temperature... therefore the wax was semi-solid, not liquid. If liquid, these bubbles would have popped.

    I think I will continue the experiment for a couple more cycles...

    2nd pass, 2 degrees hotter:


    Only 2 degrees hotter, now 99% of bubbles are gone... but there are now a few craters where some bubbles were.  "Better" me thinks, but I also think the skis need a couple more cycles until they aren't absorbing any more wax...

    Also: on pass 3 and 4 through the hotbox, I have been trying something I call "reverse hot boxing." Ray from Alpine Ski Tuning postulated that the warm wax was actually trapping some hot air in the ski, which made saturation more difficult. I decided to try prepping the ski completely, then throwing it in the box for an hour before waxing, then returning to the box. The results are quite good. I have NOT yet proven whether more or less wax is actually being absorbed, as I will only be able to do that be waxing 2 identical skis by both methods and weighing them after the experiment... but I WILL get to that at some point.

  • 13 Oct 2012 8:23 AM | Deleted user
    1st step to Great Performance!
    Every Tuner
    should be able measure base flatness. It isn't hard to do. Actual flattening is harder, but can be done quickly with the right tools and techniques. Even if you have a shop do all your new ski prep, you should at LEAST be able to measure the product the shops are providing, and to monitor the ski as it wears.

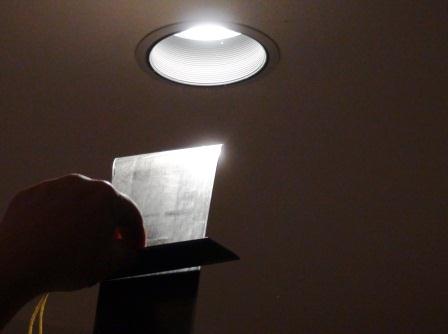
    I am holding 1 edge up for illustration purposes, but this is what you should see: a shadow with a little light creeping through.

    To measure flatness using a true bar and light (the most common method), Hold the ski such that it is pointing DIRECTLY at a light source (but not the sun). Put the true bar onto the ski between the light source and your eye. Note where the light is coming through. These are the "low spots." The bar is riding on the "high spots." If there is NO light coming through, that indicates 1 of 2 possibilities: 1.) The ski is perfectly flat OR 2.) you aren't hold the ski at the right angle to the light. #2 is usually the right answer.
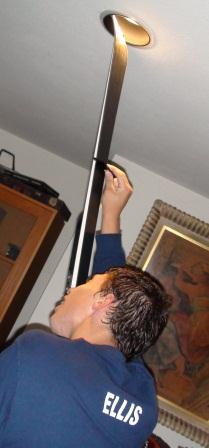

    Here Ty is showing:  Light -> Bar -> Eye. You MUST be inline with the light source.

    A FLAT base is one of the most important steps in extracting top performance from a ski, AND in helping a good skier develop "touch" and/or "snow feel." Why? Because  if the base is NOT flat, the ski cannot behave the way the designers of the ski intended. As a skier, if the skis won't perform properly, the skier will naturally "compensate." This means extra movements/stances that are not helping the skier ski well.

    This means that EVERY racer from the youngest novice to the most advanced should have a PERFECTLY flat ski. Especially the youngest- so that they can learn properly right from the start (no bad habits).


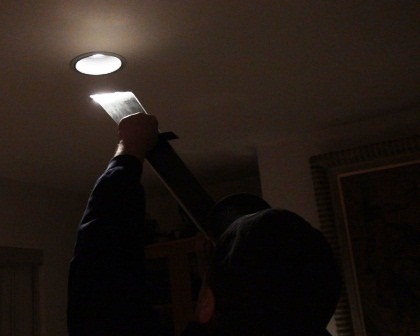
    The amount of light coming through SHOULD BE VERY little. So how you hold the bar and ski in relation to the light source is critical.


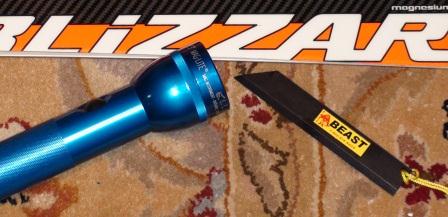
    All you need to check flatness: Light and a True bar


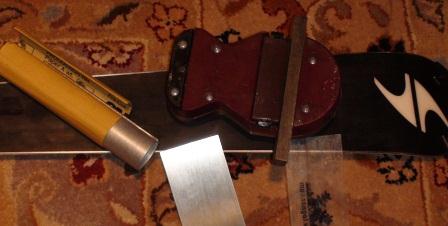
    To flatten, you need sandpaper and a sharp scraper. Above I have a Ray's Way Flattening Tube and Ski Visions Planer with carbide bar. This is my preferred combination.


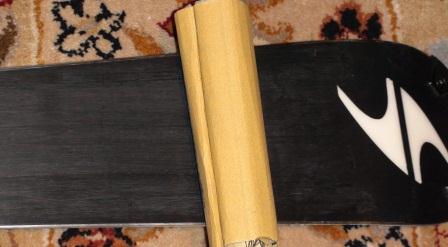
    Start but lowering the high spots with sandpaper. The Ray's Way roll increases pressure to make the job faster. Sand to loosen the material then...


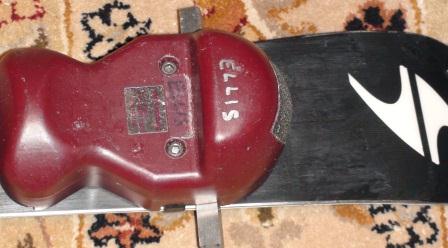
    Scrape away the loose plastic with the planner. Go back and forth between the two tools until flat. Recheck with the True Bar between each cycle.


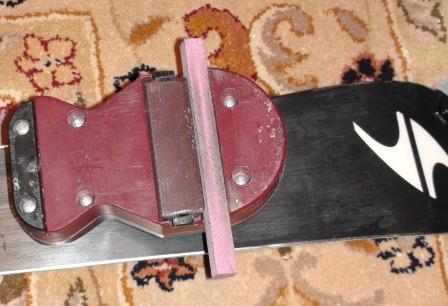
    Put one of the structuring stones in the planer to finish the job.

    Modern race skis have a MUCH better factory finish than they used to. Generally, new skis come relatively flat- especially the top FIS models. But at least 90% of new skis that I look at need flattening before they hit the snow- IF you want them to ski as designed. Tips and tails are the most critical.

    I have run at least 100 experiments with ski flatness over the years, and I am still always amazed  how big a difference removing .001 to .002 of material can make to ski performance. Many skis are concave by .005 to .010. They are no fun to ski on at all- once you have experienced a GREAT tune. Put in the time to get your skis flat and it will pay you back on the hill!

    BTW: There are a FEW tuners who advocate concave skis for racers. I have skied on the products and don't enjoy them at all. While it is TRUE that those skis have a natural propensity to carve, it is also true that the skis ONLY want to carve. On injected ice, the skis may be useful and powerful. Everywhere else, they limit the racer's ability to adjust line. Especially in the NW, FLAT is FAST!

  • 30 Sep 2012 3:00 PM | Deleted user
    Everyday Repairs
    One area of ski work I haven't covered is the everyday repairs that come up: minor delaminations and base gouges. There are several ways to fix each of these defects, but I will start with the most basic repairs and then build on that knowledge.

    Basic Base Repair. Tools/Supplies Required: P-Tex Candle, matches, and a SHARP plastic scraper. You already have the scraper, right? So all you need is a few candles and matches. $5 worth of candles (about $1/each) will last through all but the rockiest season.

    To repair a small gouge, simply light the candle and let it drip onto something metal (not flammable) for 30 seconds of so. Then bring the candle over the gouge and drip overlapping drips all the way along the length of the gouge. Repeat at least once, 3 to 4 times may be required for deep gouges. When done, blow the candle out and hang it over something NON FLAMMABLE until it has cooled and solidified. P-Tex candles burn EXTREMELY HOT and the molten plastic can burn skin or anything else it touches very quickly. Be CAREFUL!

    After a minute or so, the repair will have cooled enough to be scraped. GENTLY scrape the excess plastic off of the repair until the ski is again flat. Then use a brass brush to restore the structure (or something like) in the area of the repair. Wax the ski, and you are done! Easy, eh?
    The advantages of P-Tex candles are that they are cheap, easy to work with, and compact. The disadvantage is that the repairs are softer than the surrounding base material, so consequently they aren't all that durable. But every tool kit should have a few candles in it, as sometimes a quick repair is all you really need.      (pictures to follow)

    Basic Delamination Repair. Tools/Supplies Required: Epoxy, masking tape (or base tape), panzer file, sandpaper, and clamp(s). Less than $20- especially if you already have a panzer file.

    Repairs steps an pictures to follow.

    More advanced repairs to follow also.


    -Gadget
  • 25 Sep 2012 6:15 PM | Deleted user
    I hope you enjoy this article by Famous Tuning/Waxing Guru Blake Lewis. Thanks Blake!

    scrapertherapy.pdf
  • 02 Sep 2012 10:40 PM | Deleted user
    World cup and other shops put on clinics for learning the basics in a relaxed environment. Blake Lewis offers 1 on 1 clinics if you want more detail, and I am available also if you have questions.

    I haven't put on a tuning clinic in a couple of years. If there is enough interest, I will do one this fall or winter. Let me know if you are interested, and what you want me to demo.

    If Ty and I get around to it, we are still planning some videos, but I may only post to Sprongo (rather than YouTube) to keep a bit more information within CMAC.


All Tuning Blog Posts

Powered by Wild Apricot Membership Software